發表文章

git remote指令操作

推入遠端 將最新的commit(HEAD)推入遠端origin (Code Review) git push origi n HEAD:refs/for/master 推入遠端 git push origin master 邪惡版推入遠端(強制) git push origin master --force -f是--force的短指令 如果我目前分支不是master而是yhchiu , 但是我想推到遠端上改成new_patch這個分支 git push origin yhchiu:new_patch 實際上不見得一定要推分支 , 指定某個commit也可以推 顯示本地跟遠端所有branch git branch -a 顯示有哪幾個遠端名稱/遠端名稱及網址/遠端詳細訊息 git remote show git remote -v 加入新的遠端伺服器,命名為origin2 git remote add origin2 ssh://yhchiu@192.168.10.30:29418/NewDevice 下面是一個遠端同步的應用: 我在遠端伺服器192.168.10.30上面用我的帳號yhchiu的家目錄中建立了一個資料夾public並在上面clone了NewDevice的git庫,所以我就會有一個/home/yhchiu/public/NewDevice的git資料夾 我可以在另一台電腦上直接clone我家目錄下的這個git ssh://yhchiu@192.168.10.30/home/yhchiu/public/NewDevice 另外我也可以將這個url加入remote變成合併原本的目錄和我在我家目錄上建的目錄 刪除某個遠端伺服器 git remote rm origin2 遠端伺服器改名 git remote rename pb paul 更新遠端資料 git pull 不要隨便在任一個commit/branch之後或是使用這個指令,是否亂掉可以用gitk查看左上角的分支線路,不是一條而是有迴圈就是出問題了,得先要恢復到某個版本 git pull origin master 從所有的遠端伺服器上抓取資料/從預...

抓取網路裝置名稱

圖片

抓取系統Memory大小

圖片

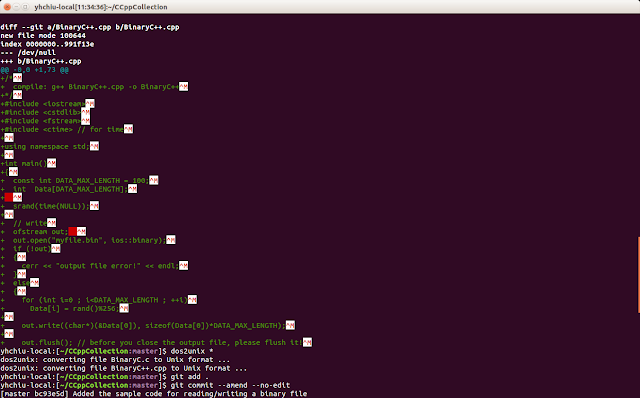
一張圖說明dos2unix指令功能

圖片

git全域設定,局部設定與移除/取消設定

git分為全域設定和局部設定(Repo內) 忽略空白處變化,如果是寫python的話就不能忽略空白處變化 基於讓每個環境都有一致的呈現結果,我也不建議忽略空白處變化 git config --global apply.whitespace nowarn 有些git下載回來設定檔裡面有no-fast-forward的設定,會阻止我們用force push修改以前的修正 git config branch.master.mergeoptions "--no-ff" 如果想拿掉某個config就用unset來取消設定 git config --unset branch.master.mergeoptions 若主要是在ubuntu中開發, 而偶爾會在windows上開發,建議windows部份設定忽略檔案的屬性改變,以及讓git自動轉換換行字元(CRLF->LF) 非常不建議同一份git目錄在windows開發又搬移到linux上開發, 因為會有換行/權限/等等的問題 git config --global core.fileMode false # In Windows/Mac, push/pull convert the line feed git config --global core.autocrlf true # In Ubuntu/Linux,convert CRLF to LF while push git config --global core.autocrlf input Ref:https://help.github.com/articles/dealing-with-line-endings/ Windows  CRLF => \r\n Linux LF \n Mac CR \r 檢查文件是否混合兩種換行方法,若有就會拒絕commit, 因為換行會成script無法正確的parsing,所以我會建議設定這個 git config --global core.safecrlf true 如果檔案被拒絕,可以用dos2unix將檔案的換行符號換成unix的LF 如果你修改了上面這些設定,請確保你的git目錄內的檔案都是一致的 git rm --cac...

產生編譯日期(Build Date)並自動加入APP內

本文提供給在AOSP內編譯APP, 自動產生編譯日期(Build Date)並自動加入APP內 緣由: 某些板子用的AOSP在產生OTA檔案時會固定的APP編譯後的檔案時間,因此無法 網路上用APP內的classes.dex日期 來取,所以有額外需求要產生build date。這方法的進階應用是自動抓取目前的APP git資訊並加入生成build檔案,可以用來協助研發人員判讀使用的版本,可參考我之前的 文章 抓取git commit資訊。 Android.mk內加入下面的define和call,用來自動產生build date檔,並放入APP Assets中 define generate-build-date   $(info $(LOCAL_PACKAGE_NAME) build date ... $(shell date "+%y%m%d %H%M%S") $(shell mkdir -p $(dir $(1)); LC_TIME=en_US.UTF-8 date "+%y%m%d %H:%M:%S" > $(1) && chmod $(2) $(1))) endef $(call generate-build-date,$(LOCAL_PATH)/assets/builddate,0644) 上面這裡使用的build date時間格式是"年月日 時:分:秒" $ date "+%y%m%d %H:%M:%S" 170119 09:31:11 另外在APP程式碼中加入 final static String UNDEFINED_BUILD_DATE = "UndefinedBuildDate"; private String mBuildDate = UNDEFINED_BUILD_DATE; private void initAppBuildDate() {     try {         mBuildDate = loadBuildDateFromAsset();     } finally {         if (mBuildDate == null |...

設置Logcat預設大小(Android 5以後)

Android 5.0之後採用logd作為logcat處理界面,先前在kernel設置logcat預設大小的方式,已經無法正確生效。 在LogBuffer::init()內可以看到logd設置logcat大小的方法 system/core/logd/LogBuffer.cpp void LogBuffer::init() {     static const char global_tuneable[] = "persist.logd.size";     static const char global_default[] = "ro.logd.size"     unsigned long default_size = property_get_size(global_tuneable); 板子自帶logcat大小,在系統Property中"ro.logd.size" 全域logcat大小,可設置系統Property "persist.logd.size" 各自logcat大小,可設置系統Property   "persist.logd.size.main"   "persist.logd.size.radio"   "persist.logd.size.events"   "persist.logd.size.system"   "persist.logd.size.crash"   "persist.logd.size.security"   "persist.logd.size.kernel" 上面的名稱定義在 system/core/liblog/logger_name.c static const char *LOG_NAME[LOG_ID_MAX] = {     [LOG_ID_MAIN] = "main",     [LOG_ID_RADIO] = "radio",     [LOG_ID_EVENTS] = "events...

掃描自身所有的port是否可以連接

掃描自身所有的port是否可以連接 netcat -z -n -v localhost 1-65535 2>&1 | grep succeeded 來源:https://www.digitalocean.com/community/tutorials/how-to-use-netcat-to-establish-and-test-tcp-and-udp-connections-on-a-vps

Ubuntu設定ADB連接USB裝置

Ubuntu設定ADB連接USB裝置 SUBSYSTEM=="usb", ATTRS{idVendor}=="1004",MODE="0666" https://www.ibm.com/developerworks/cn/linux/l-cn-udev http://nathan-inlinux.blogspot.tw/2012/11/ubuntuadbusb.html

AOSP的repo轉成git

移除AOSP編譯暫存檔案,repo的管理資料,以及各個repo用的各個git目錄 實務上,我個人會比較建議用git clean -df和git reset --hard HEAD每個,來清除暫存檔案 rm -rf out rm -rf .repo find ./ -type d -name .git |  xargs -i rm -rf {} 備份.gitignore到家目錄的bak.gitignore rm -rf ~/bak.gitignore mkdir ~/bak.gitignore find ./ -name .gitignore  | sort > ~/bak.gitignore/gitignorelist.txt find ./ -name .gitignore | xargs -i cp --parents {} ~/bak.gitignore/ 檢查一下拷貝的檔案數目是否正確 wc -l ~/bak.gitignore/gitignorelist.txt find ~/bak.gitignore/ -type f | sort | wc -l 將所有檔案加入git git init git add -A -f git commit -m "init repo" 然後再把~/.bak.gitignore內備份的gitignore加回去 cp ~/.bak.gitignore / . find ./ -type f -name .gitignore | xargs -i git add {} git commit -m ".gitignore recovered" 轉換好之後需要編譯看看是否有問題,我自己最常遭遇的就是build system內部有自動打patch或者重置到某個commit的指令,而因為我們把repo和原本的git都刪除了,會造成那些script失效,需視狀況在進行調整。